Latest Posts

Showing posts with label software. Show all posts

Hello PC Zone Readers,
WhatsApp, the popular chat app, now has a web version.In a new update  of whatsapp you can see Option "Whatsapp Web".Now you can Send/Receive Messages through this Whatsapp Web Version.Right now, the web app's only compatible with Google Chrome in combination with the Android, Windows Phone, or Blackberry version of the mobile app. iOS compatibility isn't on the way for now.
Whatsapp web connects your phone to sync messages.so your phone should always be connected.


To use this you need to follow these steps :
1. Go to
web.whatsapp.com


2. Open Your Whatsapp in mobile.and head to Menu Now select "Whatsapp web" option.
Update your Whatsapp if you Can't see the Whatsapp Web option.

3. Scan the QR Code with the phone's Camera and wait for 2 minutes.

Now you will see you Whatsapp messages on your Computer.Start Sending messages.


Hello PC Zone Readers,
This Article is Dedicated to my Best Friend Navneet.Now come to the Topic.
With the help of Android Emulator You can use Android apps/games on Your Computer.There are many Emulators Available in market like Bluestacks,Andy,YouWave etc.Bluestacks look is very pretty but it is too slow and it requires High Graphics Card.YouWave is very Fast and Easy to use Android Emulator So i found that it is best Android Emulator.
YouWave is a Android Emulator based on VirtualBox, enabling users to run Android applications on Windows.

The YouWave has two parts, the left one showcasing the apps that are installed and the right part portraits the screen of your smartphone. The user just needs to select the App, open it and work with it. The interface is way better than Native Android Emulator and works much better than any other Android emulator.


Download YouWave For PC here : YouWave


Why YouWave is best :

  • It is fastest Android Emulator.
  • It requires Low Memory of RAM.
  • You Can do Factory Reset in YouWave To make unlimited Money from Mcent like App.
  • Volume control buttons
  • Retractable control panel
Key Technical Features :
  • Supports Android 4.0 ICS (Home Version (new))
  • Runs on Windows XP/Vista/7, 32/64 bit
  • SD card functionality – enables game saving
  • Enables multi-player online games
  • Dynamic rotating – phone-like instant response (new)
  • Volume control buttons (new)
  • Retractable control panel (new)


IF You are Facing "Android OS is not Ready" Error in Youwave Follow these steps :


1) Right-click on Youwave setup and select properties.

2) Click compatibility and from the bottom, select change settings for all users.

3) in the compatibility mode, check the run this program in compatibility mode for: , select windows 7 and click apply

4) Now install youwave again and you are done.

This has been tested by me 3 times on windows 7 and is working 100%. so i guess, it should also work for windows 8. Just try and leave feedback of your experience. good luck friends.
Like Us on Facebook For More Tips And Tricks PC Zone

Hello PC Zone Readers,
Some days ago i told you Simple Methods To UnRoot Android Device
Now i will Tell you easiest way to Root your Android Device.
Rooting is the process of gaining root access on a device. This allows us full access to all aspects of the device’s operating system. The most popular thing to do once you gain root access is to flash a custom recovery image. Custom ROMs, overclocking kernels, adding certain new features, etc. all require what is known as a custom recovery image. When an Android device ships from the manufacturer, it has a recovery mode built in. This is used to restore the device if it becomes unresponsive and to perform updates to the operating system. Once you have root access, however, we can replace this recovery image with our own custom recovery image that can, not only perform those same functions, but has a lot of added new features. One such new feature, is the ability to allow us to flash custom versions of the operating system (custom ROMs).

Benefits of Rooting an Android Phone :

  • Use Special Apps Like Xposed Framework etc.
  • Use Custom ROMs In your Phone
  • Uninstall Pre Installed Apps [This way You can use more Internal Memory]
  • etc.
Disadvantages of Rooting Android Phone :
  • You End up Voiding Phone's Warranty
  • Your Phone Might Get Bricked
  • Etc.

Indtroducing,
Kingo Android Root – The easiest Android Root software you’ve ever seen
Kingo Android Root is a software, programmed by years of dedicate development, which can help Android users to root their devices in the easiest and safest manner. It is free of any charges, risks and preparations. Users no longer need to mess with the complicated scripts in some forums or be afraid of bricking and damaging their phone.
Unlike any other rooting instructions, self-developed tools or programs, Kingo Android ROOT is trustworthy software that has been extensively tested by millions of Android users and carefully programmed after years of development.
It can help you to true mastery of your Android.

What’s good in rooting with Kingo Android ROOT?

  • Faster performance
  • Preserve battery life
  • Access root-only apps
  • Remove carrier bloatware
  • Customizable appearance
  • Attain admin level permission
Requirments -
  • Your Device should have 40% - 50% Battery
  • Enable USB Debugging on your device.
  • Internet connection is required.
  •  USB Cable id Required
IMPORTANT: DO READ THE NOTIFICATIONS BEFORE YOU PROCEED
Rooting has its advantages for sure, however, it may also lead to certain consequences. So before jumping into this, please be sure you know what you are doing.

Steps To Root :

Step 1: Free download Kingo Android Root, install and launch it on your computer.

Step 2: Next, connect your device to computer via USB cable. Make sure the connection is stable. Do not touch or unplug the cable till the end.
Step 3: [If you have already installed driver software on your PC, skip to the next step]
After connecting to computer, Kingo Android Root will automatically check driver for your device and if it isn’t installed on your PC, it will download and install for you. Once driver installation is finished, the program will establish connection with your device.


Step 4: [If you have already enabled USB Debugging Mode, skip to the next step]
Now enable USB Debugging on your device manually by following the detailed instructions on the interface of Kingo Android Root according to your Android version respectively. Once enabled, your device model name and root status will appear on the software as long as ROOT Notifications and a ROOT button.


Step 5: After realizing the risks and possible consequences of Android rooting behavior, click ROOT to start rooting your device. It will take a few minutes to complete the process. The time required by the process varies from different objective conditions such as connection, network, phone models and all. 


 Step 6: If it succeeds, which happens in most cases, Kingo Root will give you a success notice. DO NOT UNPLUG YOUR DEVICE YET! Please click “Finish” and wait for your device to reboot.


Step 7: When your device successfully reboots itself, Kingo Android Root will again establish connection with your device. There would a screen pop out on your device shown as below. Click “Grant” to superuser privilege. Check your device and find out SuperSU icon, which is the mark of a successful ROOT.


 Step 8: Kingo Android Root now will show you a ROOT Status of your device as YES. And you will have the option to remove root from your device as well by just one-click.

Like Us on Facebook For More Tips And Tricks PC Zone

Hello PC Zone Readers,
If your PC isn't running as smoothly as it did when you first took it out of the box, the likely culprit is a fragmented hard drive, an overabundance of junk files, a Windows Registry in disarray, or a combination of those three ills. Fortunately, AVG PC TuneUp 2015 improves your Windows computer's performance by removing junk files, uninstalling unneeded programs, defragmenting the hard drive, and much, much more. Overall, the software does a respectable job of revitalizing worn PCs, but the license limitations (and some performance shortcomings) keep it from reaching the heights of the Editors' Choice award-winning Iolo System Mechanic 14.


What's new in version 15

  • New - Added Help section into AVG Cleaner
  • Improved - Performance of Details window in AVG Cleaner
  • Improved - Enhanced AVG Zen support
  • Improved - Cleaning definitions for AVG and Google applications
  • Fixed - TuneUp main UI is opened always in front
  • Fixed - Flight Mode button shows its state correctly
  • Fixed - Revo Uninstaller logs are not deleted by Disk Cleaner
  • Fixed - Maintenance - Not run in more than 14 days state is not shown correctly
  • Fixed - Other minor bug fixes
Proof -


Download Avg pc tuneup with key


Like our Facebook page to get interesting tips and tricks www.facebook.com/shubhampczone


Hello PC Zone Readers,

AVG Internet Security is a complete package that turns your PC protects against threats from the Internet. Nuclear security suite is AVG antivirus, the Trojan, spyware and other malware reliably detects and eliminates. “AVG Internet Security” also protects you while chatting or downloading files from the Internet. An anti-spam feature checks incoming e-mails and filters out unwanted advertising messages, even before this land in your inbox. Are you often in social networks on the go, the program checked in real time, for example, sent URLs to their origin. The integrated firewall fortifies your system against espionage attacks on sensitive data. Practical: The Smart Scanning runs almost silently in the background while you continue working on your PC.


Top Features

  • File server protection
  • Protection of workstations (laptops, personal computers)
  • Anti-Spam workstations (laptops, personal computers)
  • Protect your mail server
  • The necessary level of protection
  • Our specialists are always looking for new challenges, so we can quickly develop new ways of protection.
  • AVG products protect more than 80 million PC users around the world.
  • Easy to use security

Steps To Get Free AVG Internet Security 2015 License Key :


  •  Download AVG Internet Security 2015 Installation SetUp From Here : Click Here To Download
  • While Installing You Will Be Asked To Enter The License Key
  • Enter The License Key : 8MEH-RJR4R-7FDJ6-NL3DA-CRXQC-J­EMBR-ACED
  Proof -


If that key did not worked for you.You can try these keys :

Serial Keys

8MEH-RJR4R-7FDJ6-NL3DA-CRXQC-J­EMBR-ACED
8MEH-RXYFD-JDY72-8922R-FGLP8-Q­EMBR-ACED
8MEH-RYH2W-SRS6N-H2HGA-WCDTZ-9­EMBR-ACED
8MEH-RQEZT-B9MG3-E64FA-99LLH-6­EMBR-ACED
8MEH-RTN2Z-UUKMK-6RWGA-AAM82-V­EMBR-ACED
8MEH-RB32G-U868U-TRLQR-B68SM-C­EMBR-ACED
8MEH-RRX6F-OU36X-H9ZCR-XARDZ-P­EMBR-ACED
8MEH-RAJC2-OLO77-KRRQA-HLSNJ-R­EMBR-ACED
8MEH-RWEYH-SXKCN-6H9FR-39X22-6­EMBR-ACED
8MEH-RJR4R-7FDJ6-NL3DA-CGK2C-J­EMBR-ACED
8MEH-RQX93-WH4KW-BE2FR-QDQ4B-P­EMBR-ACED
8MEH-RNXBD-G4VHF-BSLSR-Z9C6C-P­EMBR-ACED
8MEH-R2CML-SS7FW-MOXFR-TVC9T-3­EMBR-ACED
8MEH-RFR8J-PTS8Q-92ATA-O4WHO-J­EMBR-ACED
8MEH-RPDWL-THRLY-O8Z3R-4H3OA-4­EMBR-ACED
8MEH-RCB97-4HRT9-P4RRR-RRFOP-2­EMBR-ACED


Like our Facebook page to get interesting tips and tricks www.facebook.com/shubhampczone


Hello, PC Zone Readers
Today i will provide you Internet download manager 6.11 with carck and key.
Internet Download Manager ( IDM ) is a download accelator program. By using this software we are able download anything from the Internet at a high speed. But when we are download the program from its official site it is a trial version which is 30 day pack. After 30 days it will ask you to enter the  serial key or to buy license. So here is the process to make any latest downloaded Internet Download Manager full version. After doing these steps you would be able to access the full free version.
Here I will describe how can we make an latest IDM full version using some serial keys and adding some tricks. You can download the latest IDM from here.


Keep Visiting :)
             
Rooting your android device does give you a lot of privileges like custom ROM’s, kernels, themes and many more, but at the same time it will voids your phone’s warranty.

If you have a rooted android phone and want to get the warranty return or whatever reason, then you can simply unroot it. Once rooted, your android device will back to its stock firmware with valid warranty. Here I will show you two simple methods to unroot any rooted android phone or tablet.

Before you begin to unroot your android phone, make sure you have done the following:

    Backup your data: While unrooting, all the data will be wiped out. so make sure to backup all your important data either on your SD card or your PC.
    Charge your phone: Ensure that battery is charged to more than 50%.

Method #1: Use SuperSU app


 This method works for all android devices that were rooted without installing custom recovery.

supersu full unroot
1.  First, download and install SuperSU app from Play Store. 
2. Launch SuperSU app, go to Settings, and tap on ‘Full unroot’.
3. It will confirm you just tap continue. After successful, Unroot superuser 
4. will close automatically 
5. Restart your device 
6. Uninstall SuperSU and you are fully unrooted.

Method 2: Use ES File Explorer

If the above method does not work for you, then you can use this method to unroot your phone.
 

1.   Install ES File Explorer app on your device. Don’t move it to SD card.
2.  Open the app and tap the menu button
3.  Now tap on ‘Tools’ and select ‘Root Explorer’ to turn it on.


 4.  Superuser will ask you to grant privilege or root privileges to the app. Allow it.

5.  Now go back to the main screen of the app and select ‘/’ in the top corner of the screen.


6.  Go to system -> bin. Find the busybox and su file and delete them. If you can’t find any of them, just skip to the next step.
 
7.  Go back to system folder then open ‘xbin’ folder and delete the busybox and su file there (if you found any).

8. Now go back to the system folder again and open ‘app’ folder and then delete the supeuser.apk file located in the folder. That’s all.
Now restart your device and it should be unrooted.


That's it.
 Like our Facebook page for more tips and tricks www.facebook.com/shubhampczone

Hello PC Zone Users,
We always want paid apps free for android.We don't wanna spent any type of money for android paid apps. But we don't like pirates.Having said that, there's plenty of legal ways to get paid apps for free for your Android.Today i am going to Introduce Blackmart Alpha.


BlackMart Alpha allows you to get the application of your choice for free and also you can search the desired app on it. You can use the application for getting the paid app present on the Play Store for free. Get the unique paid apps and utilize them for free on your Android device with lots of entertainment.


Features of BlackMart Alpha:-

  • Download the apps from an alternate Google Play Store and doesn’t have the restrictions as posed by the Play Store.
  • Multi-language support for the user to access the app according to your known language.
  • Applications present are large in number and you don’t have to spend a single penny.
  • Easy to use and work on it making a new person to access it properly with no trouble.
  • No half apps are present you will get the full version of the applications you want to download.


Like our Facebook page to get interesting tips and tricks www.facebook.com/shubhampczone
Tethering is the ability to surf on your pc using the Net Connection of your phone
Reverse tethering is the opposite. No Wifi or 3G connection required.In this case no WiFi or 3G connection is required but rooting of android device required.

This work only for rooted users and with Windows. Tethering and reverse tethering (this tool) are not compatible at the same time, it's then not possible to turn your android phone as a WiFi hotspot.


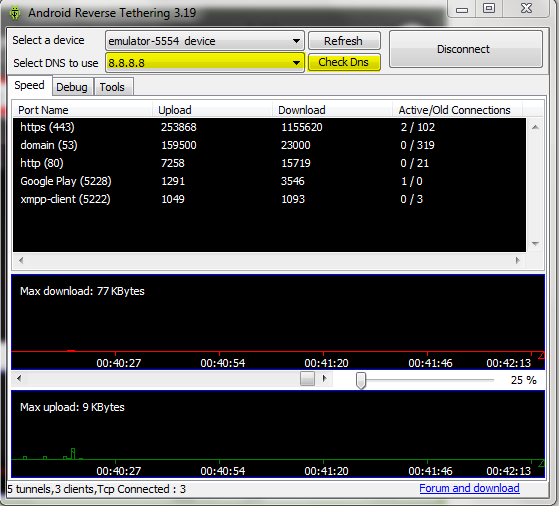
Step 1- Download Android Reverse Tethering Tool From here. Extract and then open it.

Step 2- Connect your Device with a USB cable to computer and Let the Drivers to be Installed then Hit Refresh in Android Reverse Tethering tool and select your device

Step 3- Choose a DNS


Step 4- Then choose Connect option and wait 2-3 minutes.
Android Reverse Tethering Tool will install USB Tunnel app in your Device.

Step 5- Now install Xposed Framework from here http://repo.xposed.info/module/de.robv.android.xposed.installer
and in Downloads Section search for Fake WIFI connection and download it.

Step 6- Now go to Modules section and check mark  the Fake WiFi connection module and restart your device.

Step 7- Now open the Fake wifi connection app and Choose Select all then Hit Save button.

That's it.

Like our Facebook page to get interesting tips and tricks www.facebook.com/shubhampczone


Hi Guys Here Is full versions games Compressed for free only for you :)


Get recharge of Rs 60 by paying  just Rs 10

1.Open this link http://frch.in/fcharge to  install Freecharge app on your mobile or install from Google play store.
2. Recharge your mobile with Rs. 10.
3. Apply Coupon code FCREF7HUVQ54N

4.Make payment of Rs. 10 via credit or debit card (Don't use freecharge account credits).


You will get Rs. 50 cash back :)


You can also get recharge of Rs 100 by paying  just Rs 50

1.Open freecharge.
2.
Recharge your mobile with Rs. 50

3.. Apply Coupon code A5050 

4.Make payment of Rs. 50 via credit or debit card (Don't use freecahrge account credits).
5.
Again recharge with Rs. 50 now (Use your Freecharge credits).


TO AVAIL OFFER AGAIN AND AGAIN UNINSTALL APP AND RE INSTALL IT.
USE NEW ACCOUNT EVERY TIME. 


Follow us on facebook https://www.facebook.com/shubhampczone
Hello friends after few days i am writing my new article its about  "How to turn off monitor with keyboard".with the help of monitor off utility we can turn off monitor with keyboard its very easy in use.first download then install after install run it by double clicking on it .now press Ctrl +alt+l Now you can see this


You can see This Video If you want any help


if video not appears go to http://youtu.be/BX-ROoYsVaY

Download Monitor off Utility
Hi friends After a week here i am going to tell you "How To Password Protect USB Ports".Sometimes we want to Password Protect our USB ports so that no one can insert or transfer data from/to PC via USB drive. This can be very useful if you have confidental data in your system and don’t want it to share with anyone.Gilisoft USB Lock is third party software which can disable and Password Protect your USB ports.even me Shubham Asthana using it in my PC.
Professional Softwares Like Microsoft Office,Avs Ringtone Maker,Games Like NFS and other stuffs needs serial key to activate.even windows operating systems needs to activation serial key.these software gives you a limited time to use which called trial.but after trial you have to insert serial keys.A product key, also known as a Software key, is a specific software-based key for a computer program. It certifies that the copy of the program is original.