Latest Posts

Showing posts with label featured. Show all posts

Hello PC Zone Readers,
WhatsApp, the popular chat app, now has a web version.In a new update  of whatsapp you can see Option "Whatsapp Web".Now you can Send/Receive Messages through this Whatsapp Web Version.Right now, the web app's only compatible with Google Chrome in combination with the Android, Windows Phone, or Blackberry version of the mobile app. iOS compatibility isn't on the way for now.
Whatsapp web connects your phone to sync messages.so your phone should always be connected.


To use this you need to follow these steps :
1. Go to
web.whatsapp.com


2. Open Your Whatsapp in mobile.and head to Menu Now select "Whatsapp web" option.
Update your Whatsapp if you Can't see the Whatsapp Web option.

3. Scan the QR Code with the phone's Camera and wait for 2 minutes.

Now you will see you Whatsapp messages on your Computer.Start Sending messages.

AskMeBazaar is an Online Shopping Site is an effort to recreate the great Indian shopping experience online.In my Previous Post I told You Trick to get Sandisk 8 GB Pendive + 8 GB Sdcard @ 299
Now i am going to tell you Coupon Code To get Flat Rs. 300 Discount On AskMeBazaar.com

Product Page : http://www.askmebazaar.com/

Coupon Code
: BZTTJ115

Note: Minimum Purchase Limit is Rs. 550

Steps to Follow:
Step 1.
Search For any Product.


Step 2.
Now Click On Buy Now.

Step 3.
Under 'Confirm Order' Section you will see 'Apply Coupon Code' Option.

Step 4. Now Paste This Coupon Code

BZTTJ115

Proof -


Like Us on Facebook For More Tips And Tricks PC Zone

Hello PC Zone Readers,
Some days ago i told you Simple Methods To UnRoot Android Device
Now i will Tell you easiest way to Root your Android Device.
Rooting is the process of gaining root access on a device. This allows us full access to all aspects of the device’s operating system. The most popular thing to do once you gain root access is to flash a custom recovery image. Custom ROMs, overclocking kernels, adding certain new features, etc. all require what is known as a custom recovery image. When an Android device ships from the manufacturer, it has a recovery mode built in. This is used to restore the device if it becomes unresponsive and to perform updates to the operating system. Once you have root access, however, we can replace this recovery image with our own custom recovery image that can, not only perform those same functions, but has a lot of added new features. One such new feature, is the ability to allow us to flash custom versions of the operating system (custom ROMs).

Benefits of Rooting an Android Phone :

  • Use Special Apps Like Xposed Framework etc.
  • Use Custom ROMs In your Phone
  • Uninstall Pre Installed Apps [This way You can use more Internal Memory]
  • etc.
Disadvantages of Rooting Android Phone :
  • You End up Voiding Phone's Warranty
  • Your Phone Might Get Bricked
  • Etc.

Indtroducing,
Kingo Android Root – The easiest Android Root software you’ve ever seen
Kingo Android Root is a software, programmed by years of dedicate development, which can help Android users to root their devices in the easiest and safest manner. It is free of any charges, risks and preparations. Users no longer need to mess with the complicated scripts in some forums or be afraid of bricking and damaging their phone.
Unlike any other rooting instructions, self-developed tools or programs, Kingo Android ROOT is trustworthy software that has been extensively tested by millions of Android users and carefully programmed after years of development.
It can help you to true mastery of your Android.

What’s good in rooting with Kingo Android ROOT?

  • Faster performance
  • Preserve battery life
  • Access root-only apps
  • Remove carrier bloatware
  • Customizable appearance
  • Attain admin level permission
Requirments -
  • Your Device should have 40% - 50% Battery
  • Enable USB Debugging on your device.
  • Internet connection is required.
  •  USB Cable id Required
IMPORTANT: DO READ THE NOTIFICATIONS BEFORE YOU PROCEED
Rooting has its advantages for sure, however, it may also lead to certain consequences. So before jumping into this, please be sure you know what you are doing.

Steps To Root :

Step 1: Free download Kingo Android Root, install and launch it on your computer.

Step 2: Next, connect your device to computer via USB cable. Make sure the connection is stable. Do not touch or unplug the cable till the end.
Step 3: [If you have already installed driver software on your PC, skip to the next step]
After connecting to computer, Kingo Android Root will automatically check driver for your device and if it isn’t installed on your PC, it will download and install for you. Once driver installation is finished, the program will establish connection with your device.


Step 4: [If you have already enabled USB Debugging Mode, skip to the next step]
Now enable USB Debugging on your device manually by following the detailed instructions on the interface of Kingo Android Root according to your Android version respectively. Once enabled, your device model name and root status will appear on the software as long as ROOT Notifications and a ROOT button.


Step 5: After realizing the risks and possible consequences of Android rooting behavior, click ROOT to start rooting your device. It will take a few minutes to complete the process. The time required by the process varies from different objective conditions such as connection, network, phone models and all. 


 Step 6: If it succeeds, which happens in most cases, Kingo Root will give you a success notice. DO NOT UNPLUG YOUR DEVICE YET! Please click “Finish” and wait for your device to reboot.


Step 7: When your device successfully reboots itself, Kingo Android Root will again establish connection with your device. There would a screen pop out on your device shown as below. Click “Grant” to superuser privilege. Check your device and find out SuperSU icon, which is the mark of a successful ROOT.


 Step 8: Kingo Android Root now will show you a ROOT Status of your device as YES. And you will have the option to remove root from your device as well by just one-click.

Like Us on Facebook For More Tips And Tricks PC Zone


Flipkart is one of the top shopping sites in India with variety of products. Many of us are now days preferring online shopping to save our time and to get our requirements at cheaper cost. But many products have delivery charges to pay. Today we are sharing an awesome trick to buy products on Flipkart without delivery charges. But it is restricted to WS Retail only.

Requirement For This Trick To Work:

  • Product must be sold by WS Retail.

  Steps To Bypass Delivery Charges:

  • First of all suppose you want to buy a headphone.


  • As you can see in above image, that delivery charge for this product is Rs. 40 and this product is sold by WS Retail.
  • Now after adding it to Cart the total amount we need to pay is Rs. 99 + Rs 40.

Trick To Bypass Delivery Charges:

  • Now add another product which makes the total Cart value above Rs. 500
Note: On Flipkart, if the product(s) you are buying under WS Retail values greater than Rs 500 then delivery charges are not applicable means it gets free.
  • Suppose we add any other product sold by WS Retail To Cart which makes the total cart value greater than Rs 500
 Before Adding Second Product


After Adding Second Product

 Have a Look at Delivery Details Sections.YEAH I'TS NOW FREE.

2nd Step -
  • As you can see that I have added another product sold by WS Retail which is making the total price greater than Rs 500 and hence you can see delivery charge changes to Rs 0 means Free.

  • Just place both the orders and after placing immediately cancel the second order.
 Now Cancel the order which you don't want to buy.
By this way you can get the product without paying for delivery. :D


PC Zone Readers Rocks And Flipkart Socks :D
Like Us on Facebook For More Tips And Tricks PC Zone
Rooting your android device does give you a lot of privileges like custom ROM’s, kernels, themes and many more, but at the same time it will voids your phone’s warranty.

If you have a rooted android phone and want to get the warranty return or whatever reason, then you can simply unroot it. Once rooted, your android device will back to its stock firmware with valid warranty. Here I will show you two simple methods to unroot any rooted android phone or tablet.

Before you begin to unroot your android phone, make sure you have done the following:

    Backup your data: While unrooting, all the data will be wiped out. so make sure to backup all your important data either on your SD card or your PC.
    Charge your phone: Ensure that battery is charged to more than 50%.

Method #1: Use SuperSU app


 This method works for all android devices that were rooted without installing custom recovery.

supersu full unroot
1.  First, download and install SuperSU app from Play Store. 
2. Launch SuperSU app, go to Settings, and tap on ‘Full unroot’.
3. It will confirm you just tap continue. After successful, Unroot superuser 
4. will close automatically 
5. Restart your device 
6. Uninstall SuperSU and you are fully unrooted.

Method 2: Use ES File Explorer

If the above method does not work for you, then you can use this method to unroot your phone.
 

1.   Install ES File Explorer app on your device. Don’t move it to SD card.
2.  Open the app and tap the menu button
3.  Now tap on ‘Tools’ and select ‘Root Explorer’ to turn it on.


 4.  Superuser will ask you to grant privilege or root privileges to the app. Allow it.

5.  Now go back to the main screen of the app and select ‘/’ in the top corner of the screen.


6.  Go to system -> bin. Find the busybox and su file and delete them. If you can’t find any of them, just skip to the next step.
 
7.  Go back to system folder then open ‘xbin’ folder and delete the busybox and su file there (if you found any).

8. Now go back to the system folder again and open ‘app’ folder and then delete the supeuser.apk file located in the folder. That’s all.
Now restart your device and it should be unrooted.


That's it.
 Like our Facebook page for more tips and tricks www.facebook.com/shubhampczone
Tethering is the ability to surf on your pc using the Net Connection of your phone
Reverse tethering is the opposite. No Wifi or 3G connection required.In this case no WiFi or 3G connection is required but rooting of android device required.

This work only for rooted users and with Windows. Tethering and reverse tethering (this tool) are not compatible at the same time, it's then not possible to turn your android phone as a WiFi hotspot.


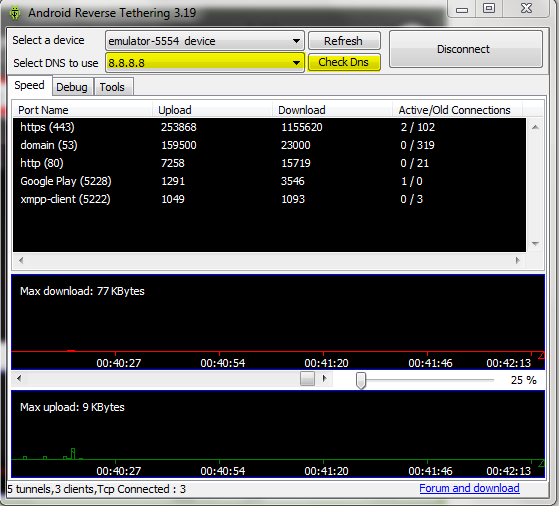
Step 1- Download Android Reverse Tethering Tool From here. Extract and then open it.

Step 2- Connect your Device with a USB cable to computer and Let the Drivers to be Installed then Hit Refresh in Android Reverse Tethering tool and select your device

Step 3- Choose a DNS


Step 4- Then choose Connect option and wait 2-3 minutes.
Android Reverse Tethering Tool will install USB Tunnel app in your Device.

Step 5- Now install Xposed Framework from here http://repo.xposed.info/module/de.robv.android.xposed.installer
and in Downloads Section search for Fake WIFI connection and download it.

Step 6- Now go to Modules section and check mark  the Fake WiFi connection module and restart your device.

Step 7- Now open the Fake wifi connection app and Choose Select all then Hit Save button.

That's it.

Like our Facebook page to get interesting tips and tricks www.facebook.com/shubhampczone


Hi Guys Here Is full versions games Compressed for free only for you :)